Turning Your Camera into a Keyboard
Using the power of computer vision and machine learning
A while ago, looking at my big mouse mat I decided to print my own (never did though, so it makes this story a bit ironic). Then I realized my keyboard was in the way. So I thought how fantastic it would be if you could just print your keyboard, seamlessly integrated into the design. I searched for a while but didn’t find any programs that would do that. And that’s the core idea behind this project and how/why I started this journey. Although, it could also have other substantial applications, such as in cell phones. Just put your phone in front of you and you have a keyboard. Or maybe in VR. That’s a mighty long way ahead though, at least for me and this project, since at the time of writing, it’s a PoC. I have only been working on this for almost 14 days now, and in my opinion it’s not a trivial problem to solve. What’s certain though is that in time it will get much, much better.
Figure 0 — The apple that hit me in the head. Now I’m no designer for sure and even this lame design took me an hour (just designing that keyboard and putting it over the mat) but I’m sure talented people would make amazing designs.
So let’s dive into how it works and how it was implemented. But before that here’s a disclaimer: I neither specialize in math nor in CV or ML, in fact I’ve been a backend dev for 7 out of 8 years of my professional career. But I just saw a problem and had to solve it (couldn’t help myself, sorry). So there are probably many mistakes here. Feel free to speak up and point them all out!
How does it work?
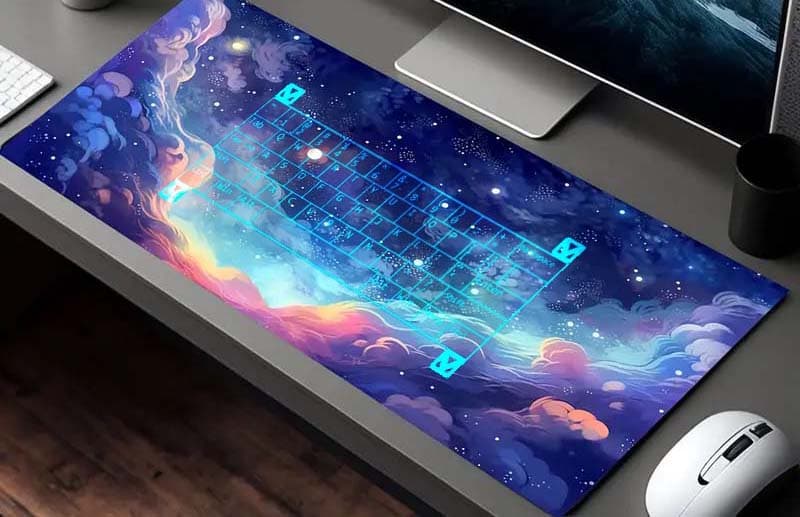
The app requires a camera and 4 markers (aka control points, aka Position Detection Patterns, aka Finder Patterns) in front of the camera to detect the boundaries of the imaginary keyboard. Ideally, though, the user would need to know where the keys are, so the markers print could include an actual keyboard as depicted in figure-1.

Figure 1 — The keyboard
The actual virtual hardware hasn’t been implemented yet, and it’s in the roadmap.
The Challenges and the Solutions
In this section I will go over some of the main challenges, their solutions and future plans for them.
Challenge 1: The Model
At first, I thought that this was my biggest challenge by a large margin (spoiler alert; I was wrong). So I dove in, and decided to use YOLOv8. Thanks to the people at Ultralytics, that was one of the easiest tasks of my life. Except for the annotations. Unlike training and inference (and how easy doing those was), labeling hundreds of images was one of the most cumbersome tasks I had ever done. And here’s the worst part, I had to do it multiple times. First time, my images just weren’t good enough. Second time, everything worked out fine, and it was working flawlessly as seen in figure-2.

Figure 2 — The first model
Here’s what was wrong with that though, the pinky finger boxes, for instance, were too wide. Basically, there just isn’t a reliable way to get the coordinates for the fingertips. Or is there? Yes, and it’s called computer vision and machine learning. So I went back to the drawing board, literally, to draw the bounding boxes from scratch. But this time, only including fingertips. I wasn’t optimistic since we’re supposed to be working with webcams with low picture quality as well, and I was afraid that there might not be enough detail for the model that way. Thankfully, it worked.
Another thing that’s worth mentioning is that I added only 2 classes. Fingers and thumbs. Maybe not the best decision, but I figured that when typing, thumbs are only used for the space bar. And I’m 99% positive that if I had added a class per finger, I would’ve gotten a considerable amount of false positives/negatives.
There’s also a whole module dedicated to dataset preparation. I have all my files (images and labels) in a single directory, then I partition and augment them. But this whole module will be completely removed in favor of a better data pipeline, maybe Roboflow.
Challenge 2: Mapping Coordinates
Now that I had the detection results, it was time to determine which is which. Based on the time that I had, I went for the most naive approach. Regarding the markers, due to perspective distortion the upper markers (relative to camera’s view) are closer together (i.e. they form a trapezoid), so enumerating them from left to right yields bottom left, top left, top right and bottom right. This needs to be improved so that the points are validated in case of false positives.
The same goes for the fingers, assigned them based on their order. If I wanted to improve this, though, it’s probably going to be harder than the markers. I tried combining the current model with depth prediction transformers (tried both intel/dpt-large and intel/dpt-hybrid which is the smaller and faster one) but they are way too slow for a use case like this which requires tens of predictions per second.
Ultimately, I feel like I should’ve gone with pose estimation instead of object detection from the beginning. Having the pose of the fingers and their angles would help with identifying the fingers, especially the pinkies. Just having those two coordinates would make the acceptable area for finger coordinates much smaller, thus reducing the chance of errors.
Challenge 3: Detecting Keystrokes
Remember how I told you about thinking the model would be my biggest challenge? Well, this right here is the greatest challenge, the final boss, the bane of the project, you get the idea. Even with my limited knowledge in math/this field, I justifiably thought that calculating coordinates in 3D space with just ONE image from a single angle and 2d coordinates and no extra hardware was virtually impossible. Sure, if you had 2 cameras, things would’ve been different, but that’s not a reasonable requirement to have. But I also didn’t think that it would be this hard, when I was imagining the solution, it seemed much simpler having those 4 markers (pfft, imagination, right?).
So now that determining exact 3D coordinates is out of the question, let me explain clearly why that is a problem. Imagine (or just checkout figure-3) that your finger is hovering above one of the keys on the second row (from the top). To the view of the camera (which is in front of you) it could seem like your finger is down on a key on the fourth row (because we can’t get the exact x, y, z coordinates). So it’s not directly possible to say for certain which key is being pressed, or not being pressed for that matter.

Figure 3
Now let’s explore the solutions I came up with and which one worked. First, I prepared a layout file, which consists of all the relative fractional coordinates of the keys (for example, box [x: 0.1, y: 0.2, w: 0.07, h: 0.2] is the Q key). This would also help with making keyboard physical layouts configurable.
The first solution was comparing the current distance of the fingers from a reference point (in this case the average Y position of all fingers) against a calibration value. It did not work out well! In my next attempt, I replaced the reference point with an adjacent finger. It was basically the same, failed.
That brings us to my final attempt, which doesn’t work well enough for a functional keyboard, but it’s way better than the previous disappointments. I introduced velocity into the equation over a sliding window. I used this in combination with the previous solution. If a finger is lower than it should be, and it has a negative velocity, relative to a downward +Y axis, then that finger should be on its way back home after a long day’s work (pressing a key).
After being able to tell which finger was down where, the rest was easy. I just got the perspective transform matrix of my markers in a unit box (i.e. (0, 0) to (1, 1) box) and got the dot product of that matrix and my finger’s coordinates. Which I then used in my keyboard layout to map it to a key. Here’s that part of the code:
perspective_boundry = np.float32([
    markers.bottom_left_marker.xy,
    markers.top_left_marker.xy,
    markers.bottom_right_marker.xy,
    markers.top_right_marker.xy,
])
target_boundry = np.float32([
    [0, 0], [0, 1], [1, 0], [1, 1],
])

matrix = cv2.getPerspectiveTransform(perspective_boundry, target_boundry)
transformed = np.dot(matrix, [*finger_coordinates.xy, 1])
transformed /= transformed[2]

# x = transformed[0], y = transformed[1]
The next solution I will try will be using signal peak detection. Finger positions are essentially a signal, a time series. And when you lower your finger to press a key and take it back up, you’re kind of forming a down-facing parabola and the peak of that parabola will be the coordinates of the pressed key.
Challenge 4: UI
I really don’t think this is even worth mentioning as a challenge, it really wasn’t but here it is anyway. For the UI, I chose pygame + pygame-gui, and it’s probably one of the worst decisions I made in the project. Not because those are bad libraries, on the contrary. But because they have another use case. Nevertheless, I had a few encounters way back when concerning updating an image view many times a second in desktop GUI libraries. I just didn’t think it was possible or at least even remotely efficient without hardware acceleration. Not a big deal though, it’s just one class, and it can be replaced at any time effortlessly. To the outside world, this is what it looks like:
detect_task = asyncio.create_task(self._detect())await self._ui.run()
# when the detection task detects markers, fingers, etc:
self._ui.update_data(detected_frame_data=self._detected_frame)

# when a keystroke is detected
self._ui.update_text(key)
So it’s really easy to just swap it out for something else, for instance another UI developed with Tkinter, since the finished app wouldn’t even need to show the live feed, maybe except in a diagnostics view, or in a calibration view if it’s still needed by then at all (hopefully calibration won’t be required in the future).
Thanks for reading. Again, feel free to share your thoughts, improvement ideas, questions or criticisms. And if you’re interested, feel free to contribute to the project on GitHub, here: https://github.com/mnvoh/cameratokeyboard